Congratulations on choosing ChemGeo software products. This tutorial demonstrates how to transfer a license to a new computer.
About This Tutorial
Definitions:
- Old host: the old computer/client the license is transferred from.
- New host: the new computer/client the license is transferred to.
The tutorial contains the sections described below.
- ‘Prerequisites‘: describes the requirements before activating a license.
- ‘Part 1: Collect Information on New Host‘: describes how to collect machine information on the new host.
- ‘Part 2: Generate license transfer file‘: describes how to uninstall the license and generate a license transfer file on the old host.
- ‘Part 3: Install license on new host‘: describes how to apply the license transfer file on the new host.
- ‘Part 4: Verification of Activated Licenses‘: describes how to verify the licenses are installed successfully.
Prerequisites
The steps in this tutorial only apply to the target machine with the following ChemGeo software products installed. A valid license (including expired) installed is required to proceed.
- LogBox
- IsoBox
- ChromBox
- GOR-Isotopes (version 2.6 and later)
Part 1: Collect Information on New Host
1. On the new host, launch the Remote Update System (RUS) utility, which is installed with ChemGeo software products, through the Windows Start menu (Programs > ChemGeo).
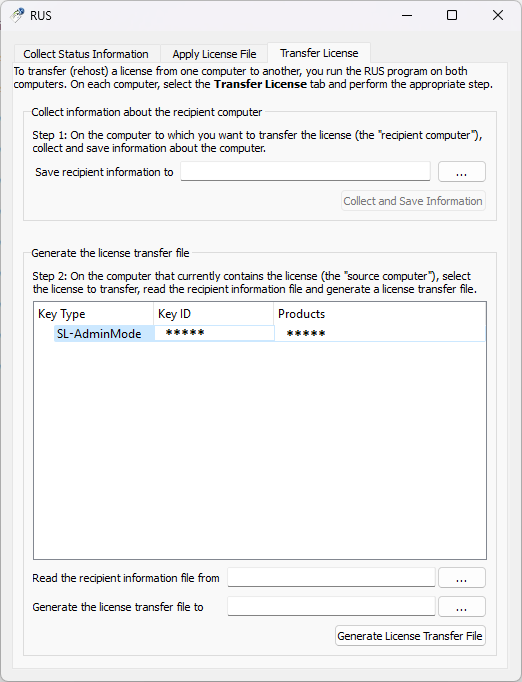
2. Switch to the Transfer License tab, the following screen is displayed:
3. Click the […] button next to the ‘Save recipient information to’ box, choose the location and name of the to-be-saved information file name, and click the Save button to generate the .id file. Copy the .id file to the old host.
Part 2: Generate license transfer file
1. On the old host, launch the RUS utility, and switch to the Transfer License tab.
2. Choose the license key to be transferred.
3. Open the .id file generated in the last step in the ‘Read the recipient information file from‘ box.
4. Click the […] button next to the ‘Generate the license transfer file to’ box, choose the location and name of the to-be-saved license transfer file name, and click the Save button to generate the .h2h file. Copy the .h2h file to the new host.
Part 3: Install license on new host
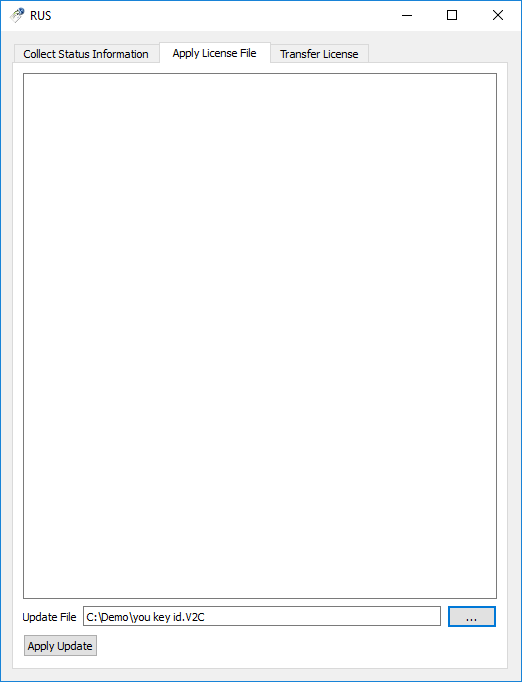
On the RUS utility window on the new host, switch to the Apply License File tab.
The following screen is displayed:
Click the […] button next to the Update File box, and select the .h2h file. Click Apply Update button to finish the transfer.
Part 4: Verification of Activated Licenses
1. Restart the ChemGeo product if already opened.
2. Access the About dialog through Help > About menu. Active licenses are listed on the right. Scroll down the list if necessary, and confirm the licenses activated for the purchased modules and the expiration dates.


